How to Install Machine Safety Shields
March 25, 2026 in Machine Safety Blog byEstimated reading time: 18 minutes
Installing machine safety shields, such as lathe chuck guards, chip shields, and drill press guards, can be tricky, especially on older machines. This guide shows how to mount, position, and secure guards properly so they protect operators without interfering with production. A poorly installed guard can interfere with operation or fail to protect the operator. Worst case, you accidentally drill into a gearbox and oil starts streaming out.
In this guide, we’ll walk through the process of installing machine safety shields on existing equipment, including locating mounting points, building brackets, and ensuring proper coverage.
Types of Machine Safety Shields
We will focus on off-the-shelf safety guards and shields that you can install directly on machinery, such as:
Each of these machines will have its own quirks when installing guarding. For example, when sizing lathe chuck guards, you should use the largest chuck diameter you use to avoid undersizing and running into problems later. Often, installing a machine safety shield requires imagination to anticipate unusual ways the machine is used, especially on older machines that were never designed with guarding in mind.
Need Installation Help?
Our highly skilled field installation technicians are here to ensure that your machine safeguarding project is done on time and within budget. Ferndale Safety is your number one resource for turnkey installation.
How to Install Machine Safety Shields: Steps
OK, so if you already have a guard or shield and you’re looking for installation guidance, you’re in the right place. However, ensure you have the right product for the right job. The wrong type of guarding for the machine and area can increase the risk of injury.
Before we even start to think about the actual process of installing safety guarding, we must identify what we are trying to protect against. In the case of a chip shield, we want to protect the user from flying chips and debris. On a belt sander, we try to protect any unused portions of the abrasive belt to reduce the risk of injury.
Remember: We’re installing a guard or shield to prevent injuries!
Learn About Mechanical Hazards
Want to know more about the types of hazards found on machinery?
First of all, do you have the right type of machine guarding? There are different types of machine guarding that you should familiarize yourself with. If the guard or shield you have interferes with production, installing a different type of machine guard may be beneficial.
Second, before you do any work on a machine, thoroughly test it and ensure all its functions are working. There’s nothing worse than doing some work on the machine and finding out it no longer starts without knowing if it was even working in the first place.
Third, LOCK OUT AND TAG OUT. Ensure that all energy sources to the machine have been disconnected.
This is often the most challenging part of installing a machine safety shield. Finding a suitable mounting point for a shield is part creativity, part engineering, and part technical know-how. Sometimes I struggled to find a nice mounting point and ended up having to get creative and manufacture brackets.
A great example of this is the 1940s-era “American” Pacemaker lathes, which were styled in a very distinctive Art Deco, streamlined manner. Finding a flat spot to mount a guard can be challenging, to say the least.
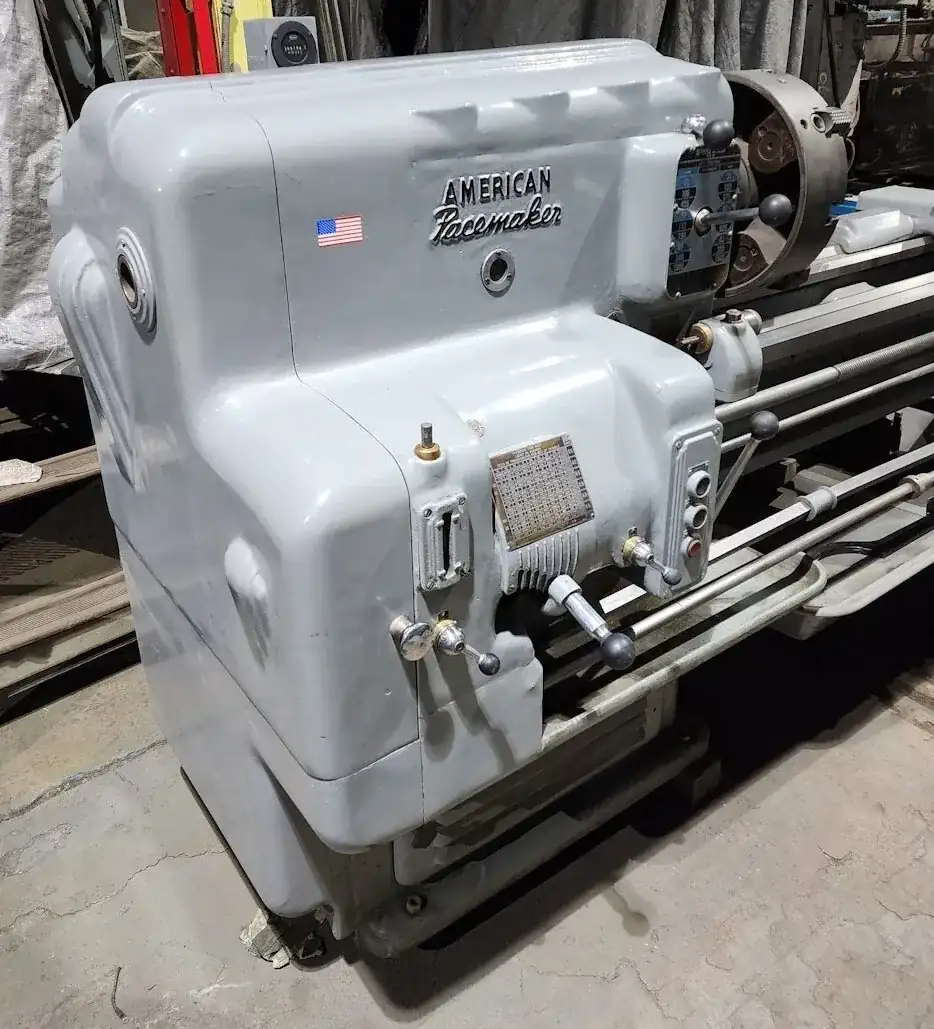
1940s American Pacemaker lathe
Find a Flat Spot to Mount On
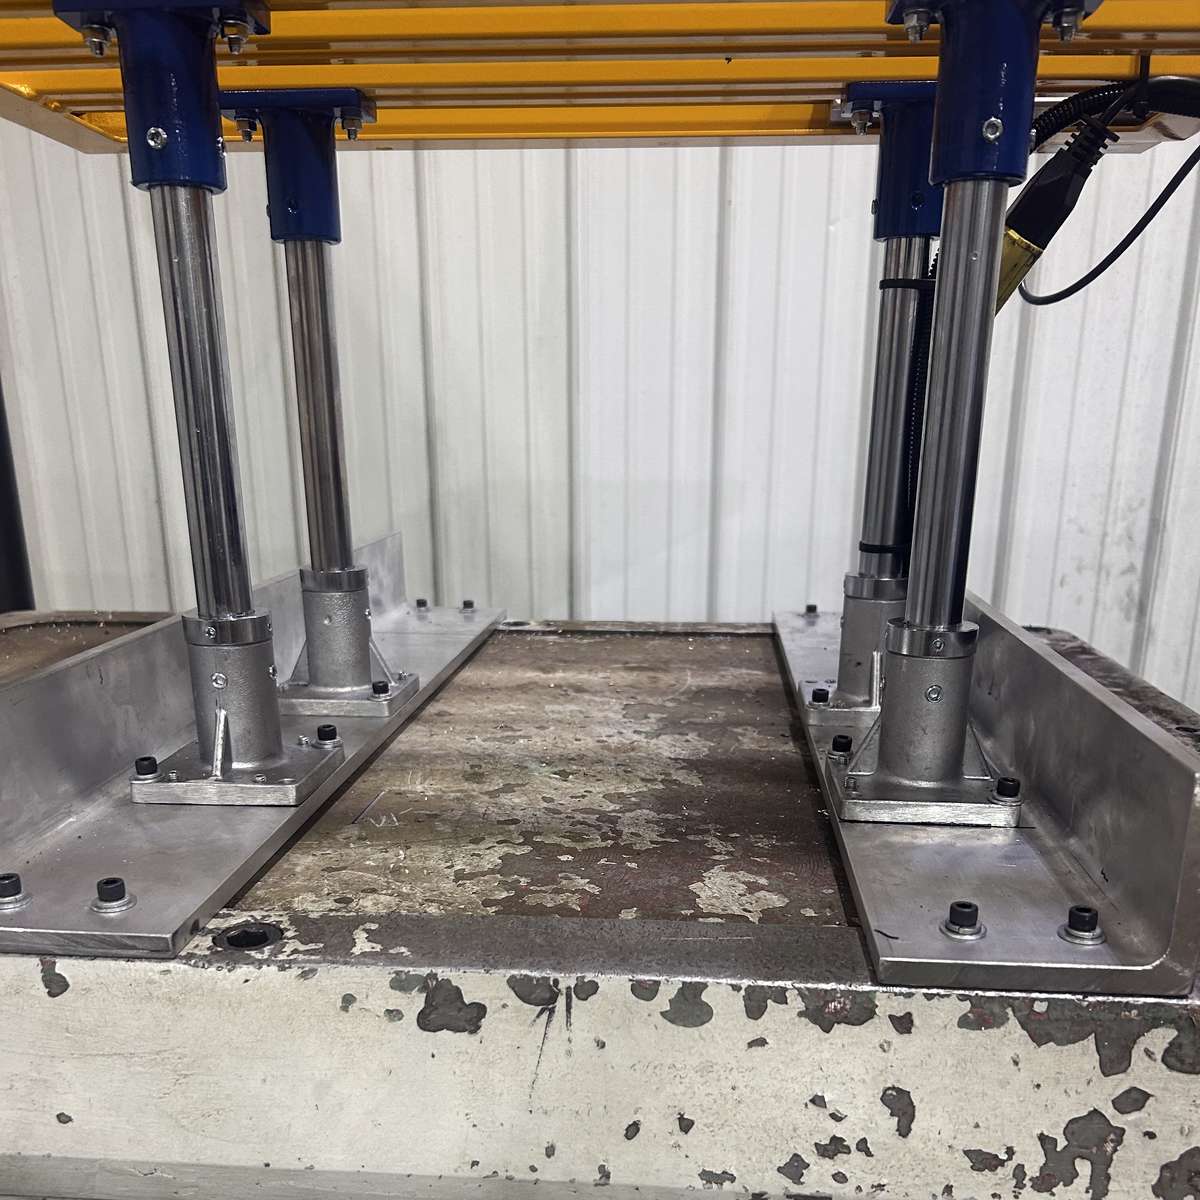
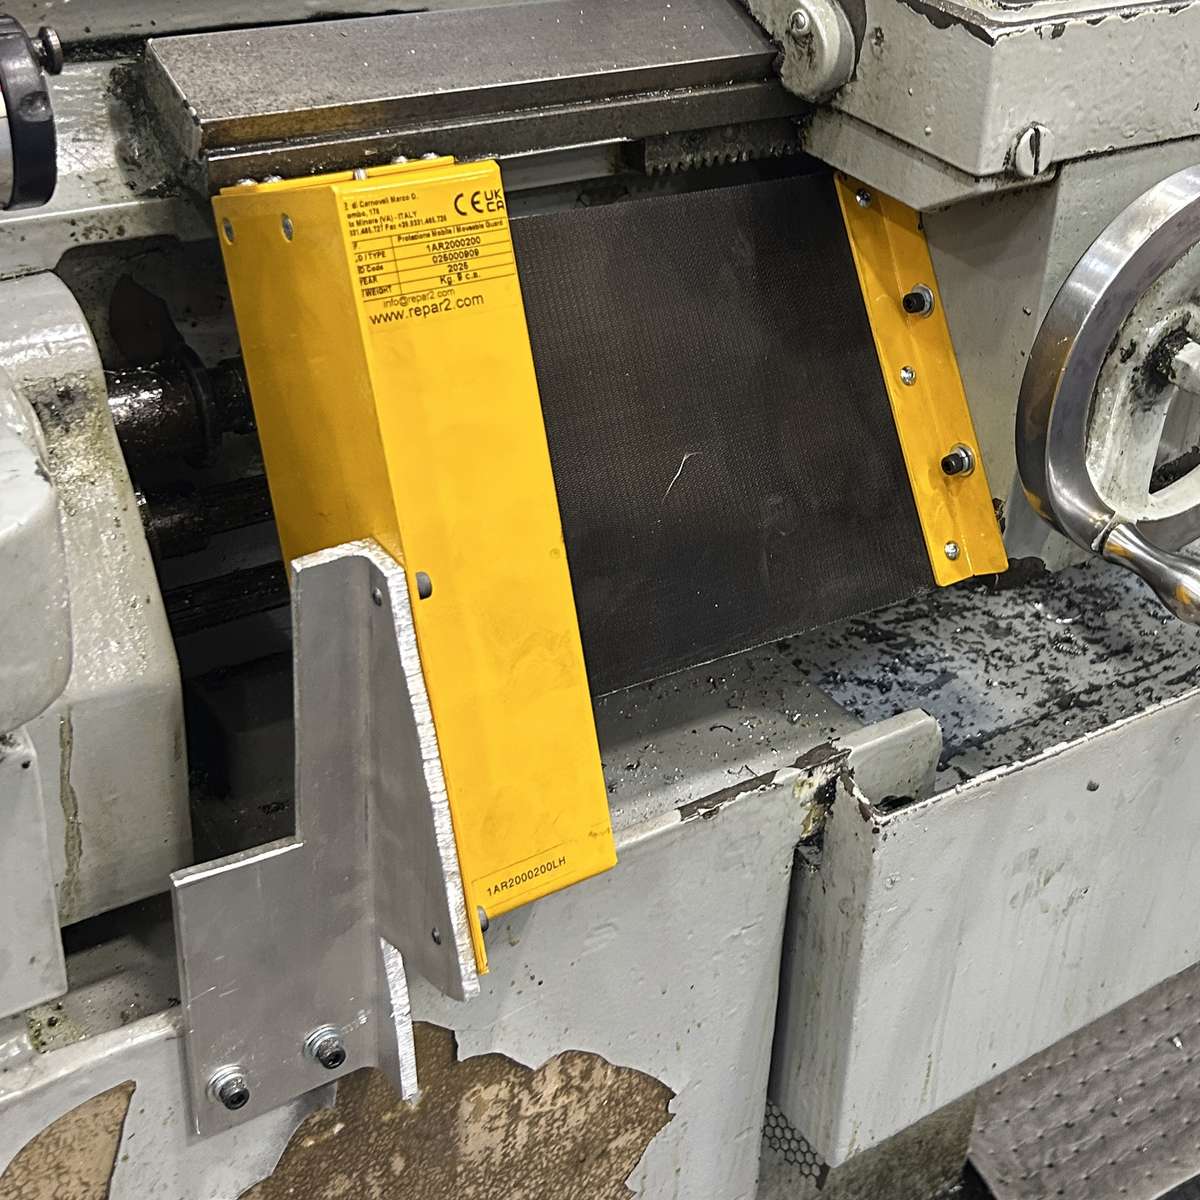
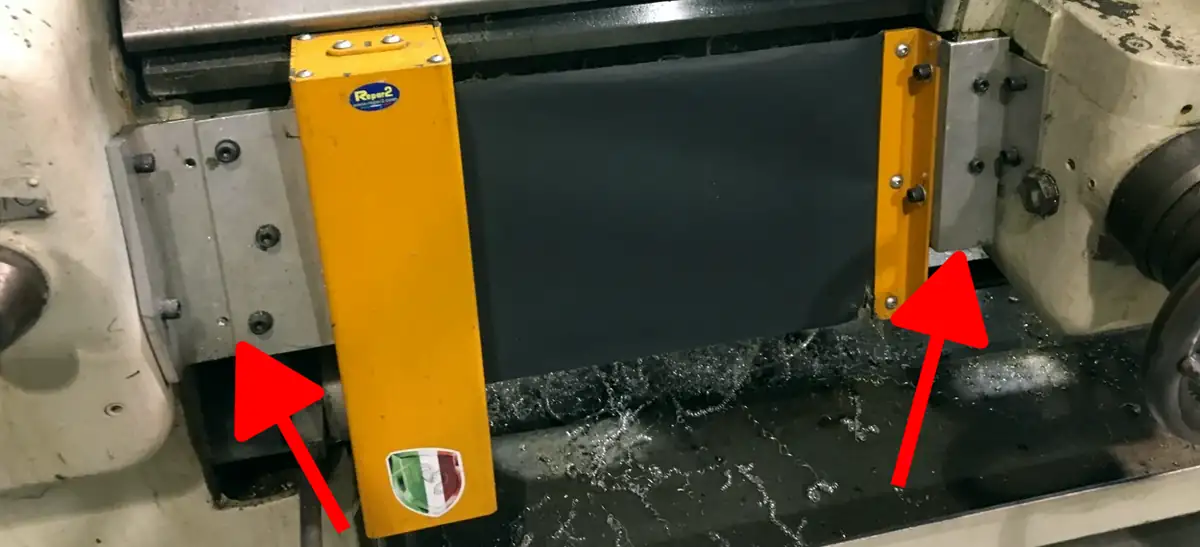
Often, we get lucky and find a nice flat spot to mount the safety shield, like in the next photo. These are the most optimal situations and make life easy. Finding these types of spots on machinery, especially machines that were never designed with safety guarding, is great, but more often than not, we have to get creative.
You might very well have to proceed to the next step and fabricate brackets if you don’t have a flat spot to mount on.
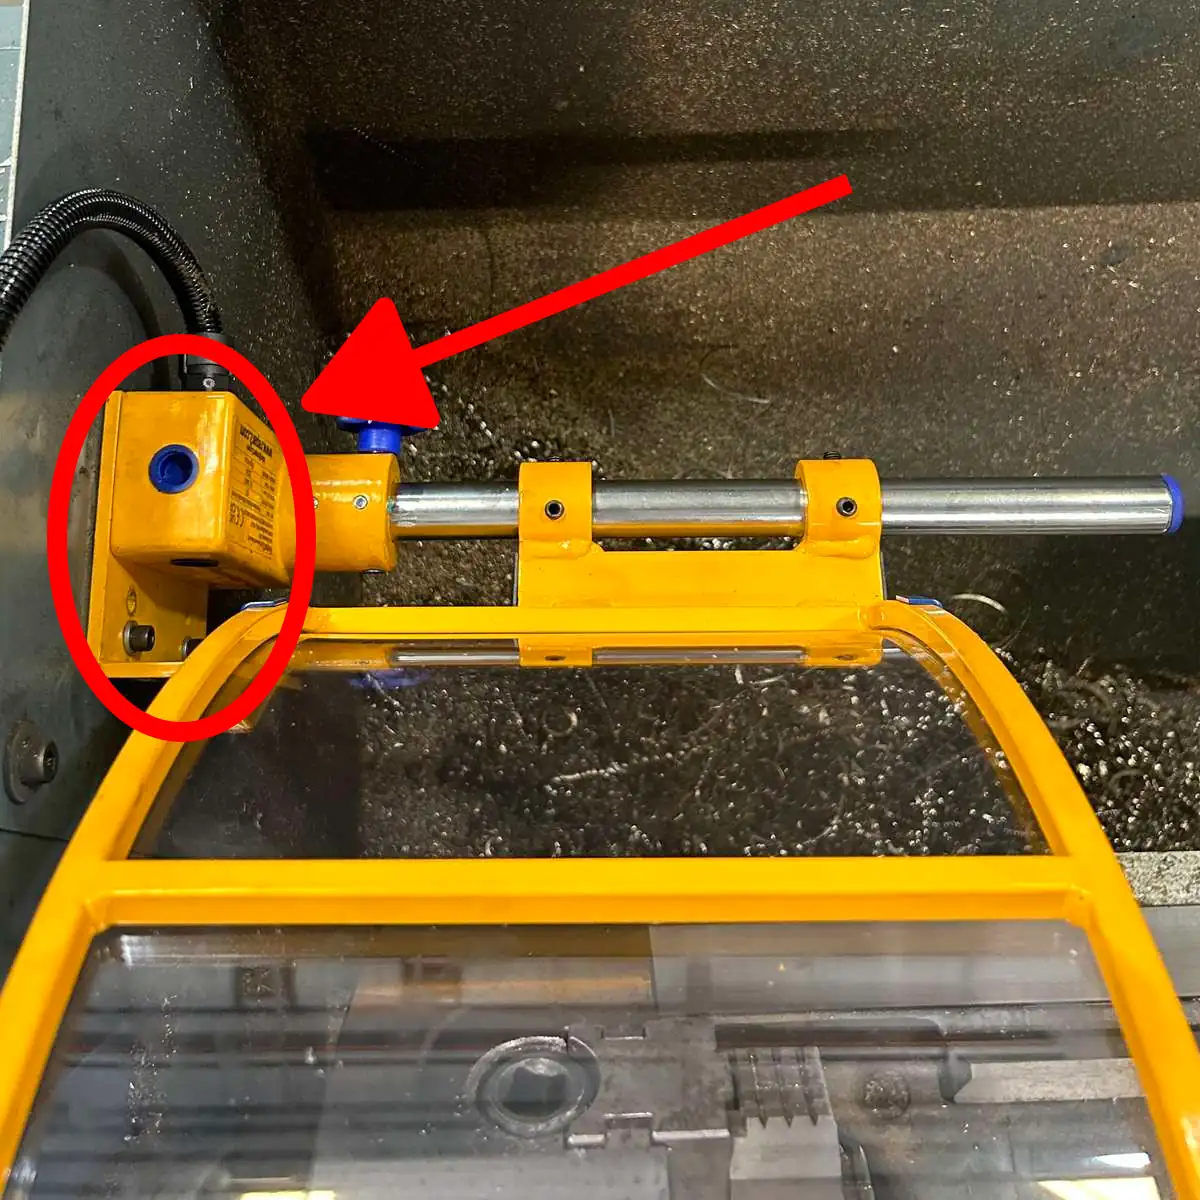
Example of a lathe chuck shield installation. The arrow points to the mounting bracket.
What Makes a Good Mounting Point?
Before drilling anything, it’s important to understand what makes a mounting point safe and reliable. Choosing the right mounting point is one of the most important parts of installing a machine guard. A poor mounting location can lead to vibration or misalignment, or even render the guard ineffective.
Here are a few things to look for:
Rigid and stable
The mounting surface should be solid enough to support the guard without flexing or vibrating during operation. Cast iron frames and heavy machine bases are usually ideal.
Outside of moving components
Make sure the mounting point is clear of any moving parts, such as lead screws, gears, belts, or slides. The guard should protect against the hazard without interfering with the machine’s movement.
Safe to drill and tap
Avoid areas that may contain oil, wiring, or internal components. Gearboxes and enclosed housings can be risky. When in doubt, double-check before drilling.
Allows full range of motion
The guard should be able to open, close, or adjust without hitting other parts of the machine. Think about how the operator will use it day to day.
Maintains visibility
Position the guard so it doesn’t block the operator’s view of the work area. A guard that gets in the way is more likely to be bypassed or removed.
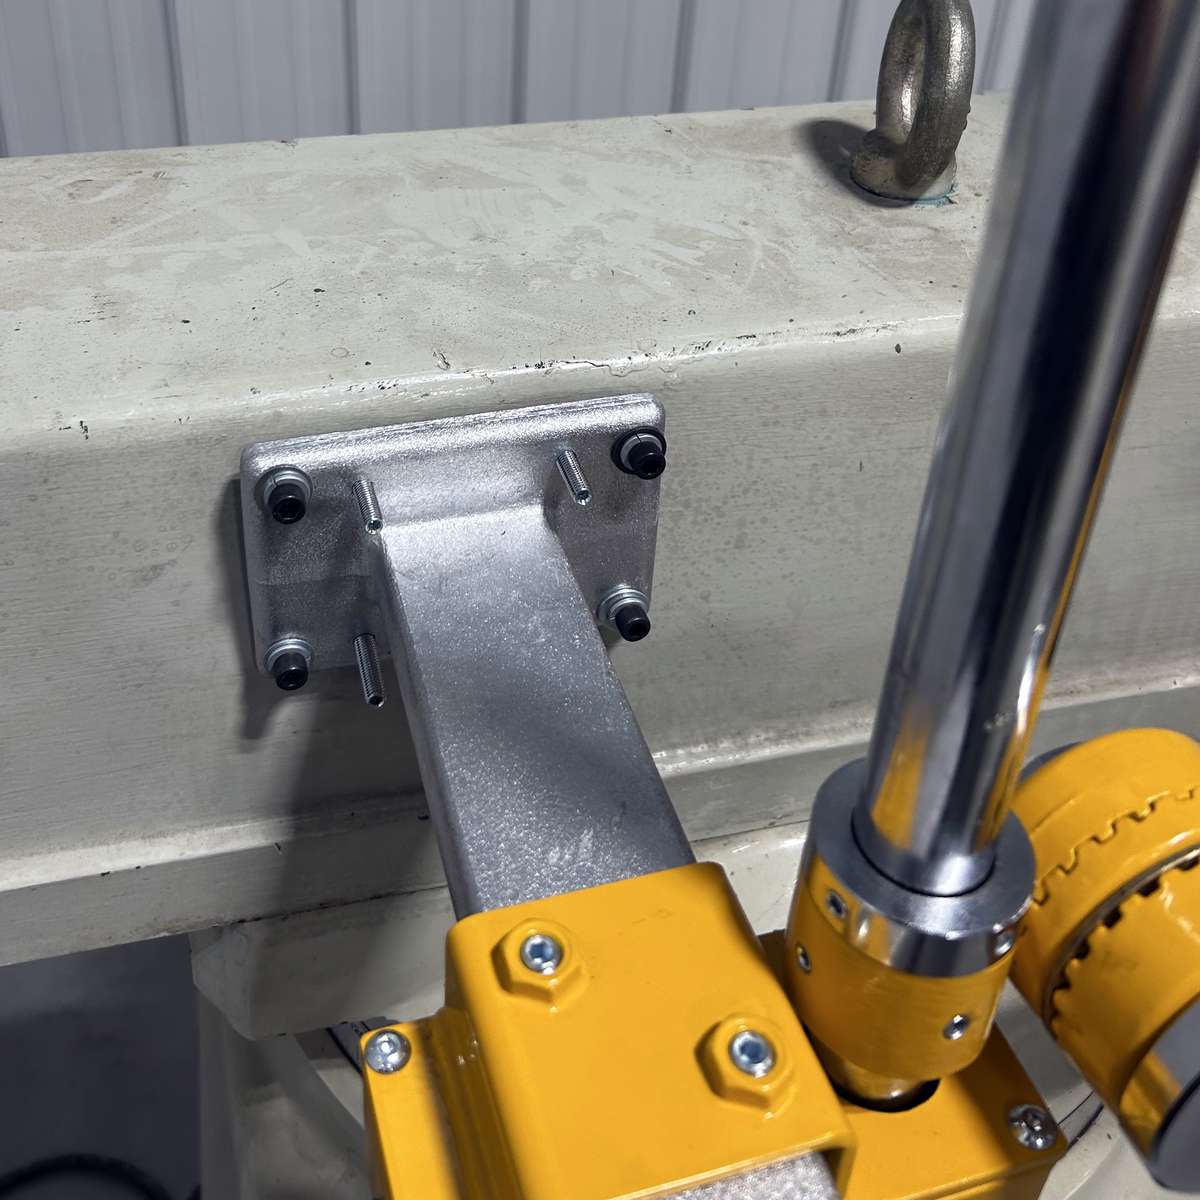
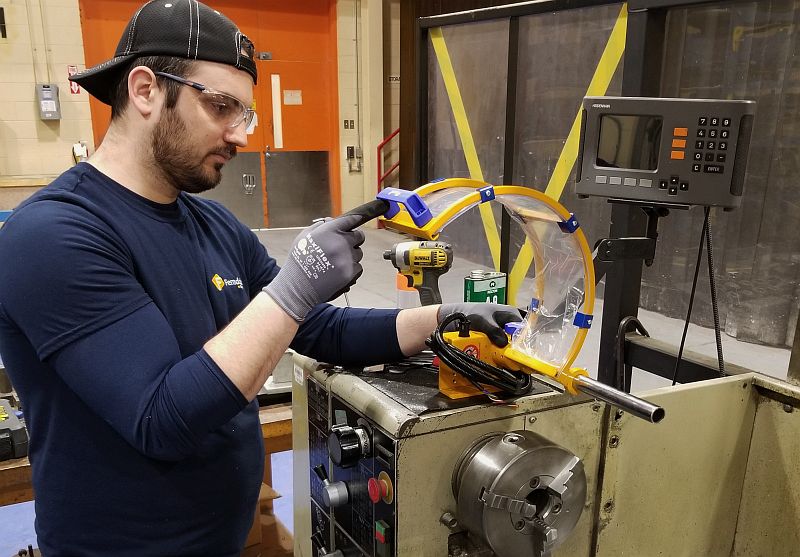
Quite often, especially with old machinery, brackets must be fabricated to install aftermarket safety guarding. In the following example, a safety guard is installed on a boring mill head. Notice all the curved surfaces, hand wheel, and levers that must be taken into consideration. This example is on the extreme end of the spectrum, but it illustrates nicely how counterintuitive things can be.
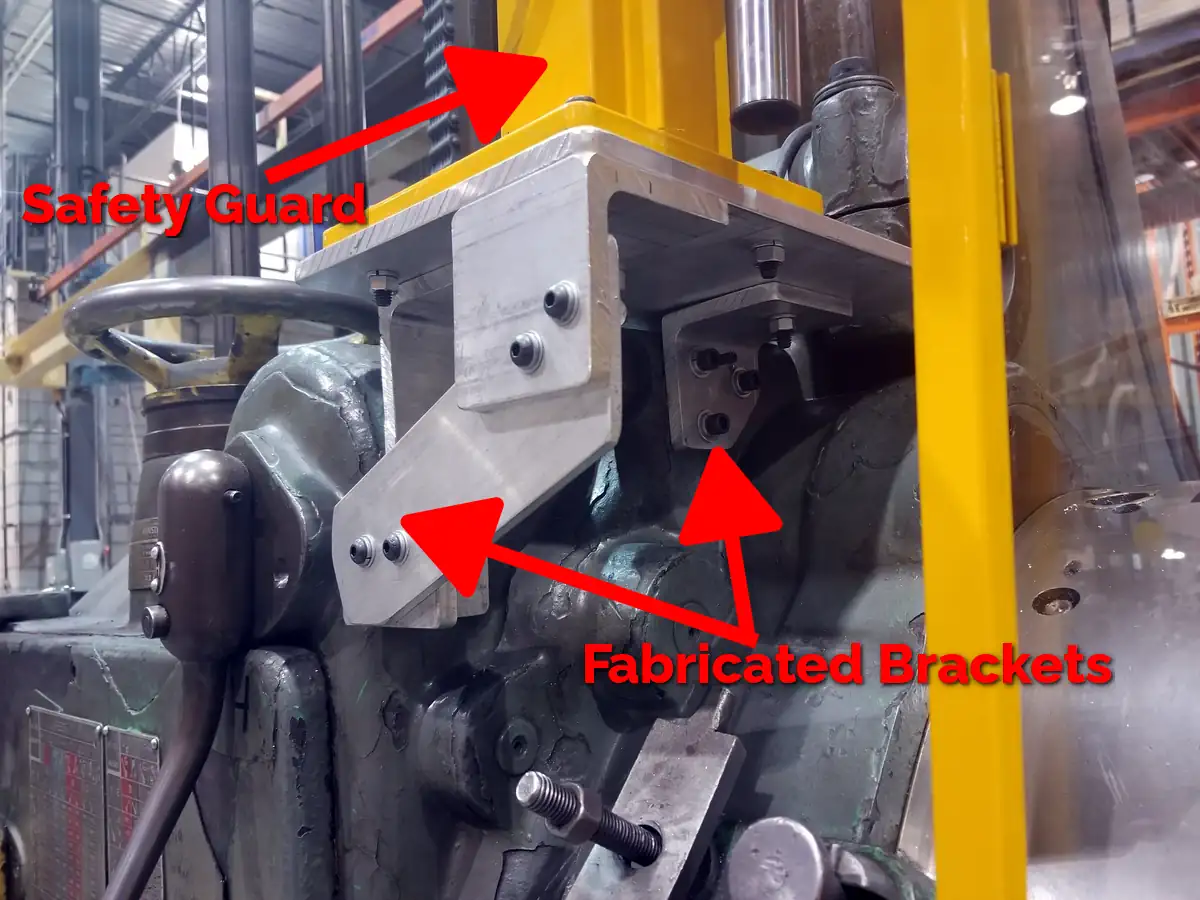
An example of a machine with no flat surfaces for mounting a guard.
An intricate aluminum mounting bracket was fabricated to create a flat base.
Avoid This Mistake
Drilling into the wrong area of a gearbox can cause internal damage and contamination.
Yes, I’ve accidentally drilled into a gearbox, and oil started flowing out of the freshly made hole. No, definitely not the best of feelings seeing that happen. It is also a pain in the butt to repair and takes a lot of extra time. But, with that being said, there are a few things you can look out for.
In addition to the risk of an oil spill, you also risk contaminating the gearbox with chips from the drilling process. If you absolutely must drill through gearboxes, try to mitigate the risk by using magnets or a vacuum to catch chips before they drop into the gearbox.
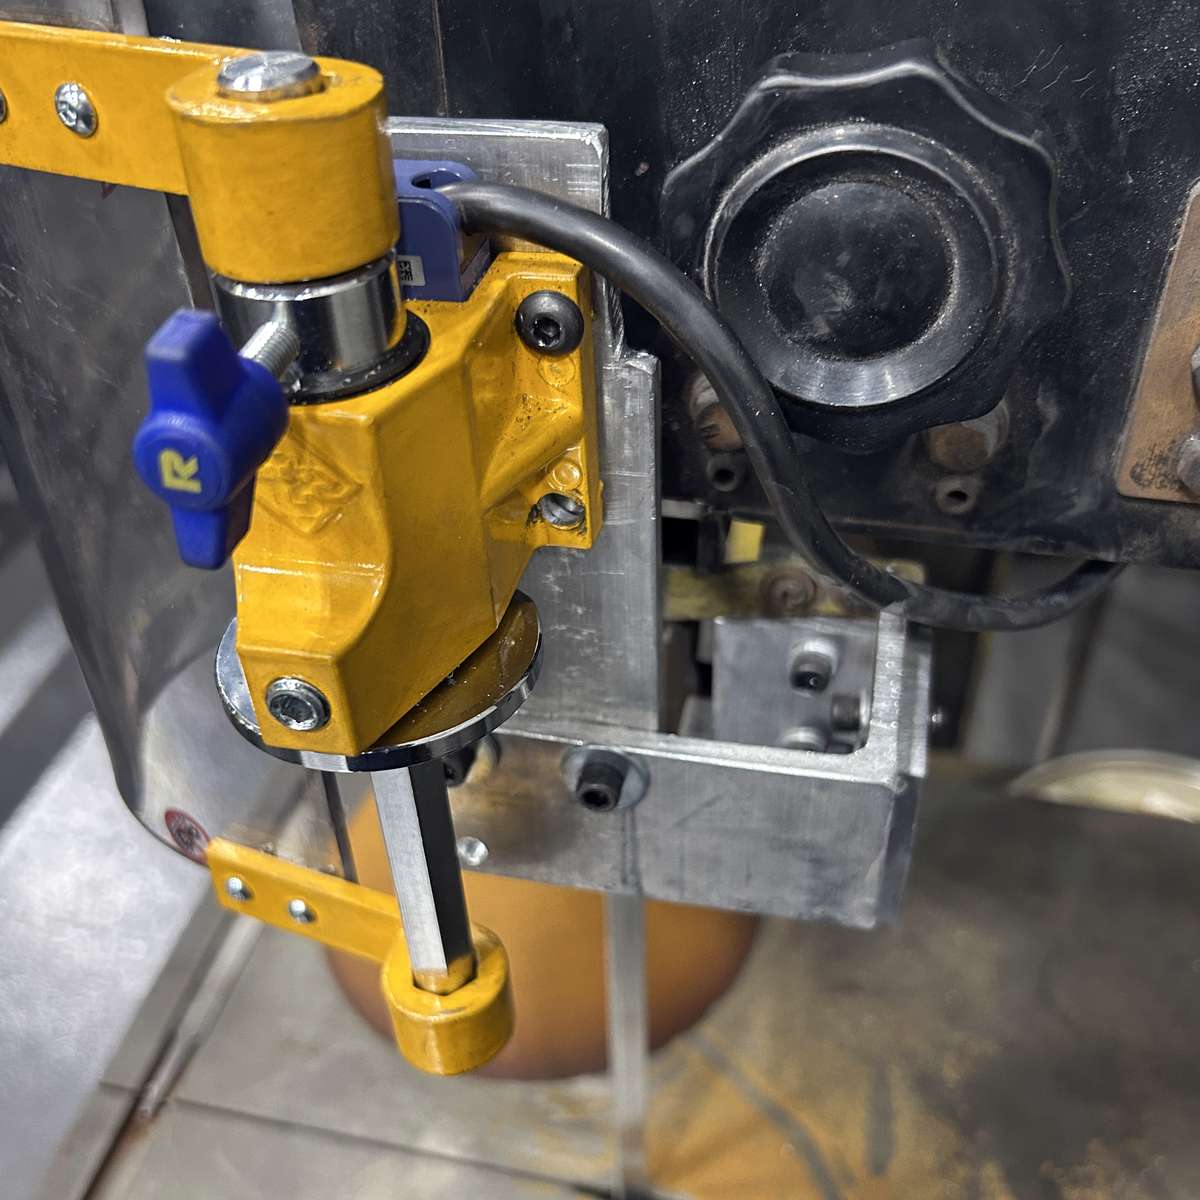
Look for oil sightglasses – The photo below is a great example. The bottom portion of the drill head is filled with oil, and the oil level is visible.
Mounting on covers – Sometimes you have to mount onto a cover. When the guard was installed, tapping the left cover produced a hollow sound. We opened the cover to take a look inside and found nothing in the way, and proceeded with the installation as shown in the photo below.

A radial arm drill press gear head is shown.
The dashed line indicates the internal gear oil level.
Try to drill into the edges of machine castings – Drill into the outer edges of machine castings whenever possible. Avoid drilling into the center of gearboxes or cast housings. The corners and edge sections typically have more material, providing a stronger and more secure mounting point. It is generally OK to drill into the edge sections, but be careful not to hit any oil channels or electrical wires.
The photo below depicts a typical gearbox. Drilling into the red hashed area is not recommended because there is not much material, and it’s easy to accidentally push your drill bit completely through. You then risk contamination of the gearbox with metal chips, and the drill bit itself could cause internal damage, especially to clutch packs or oil tubes.
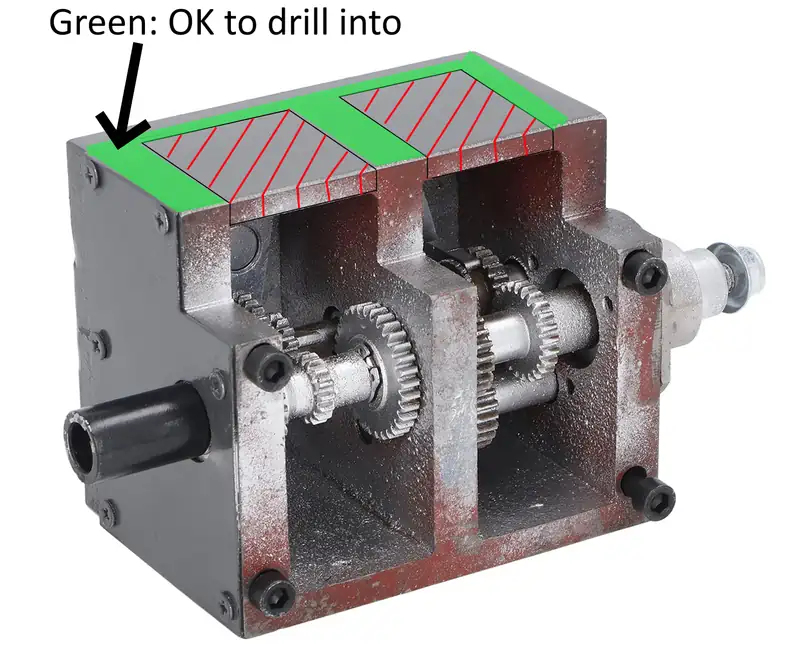
A small gearbox with one side open. The highlighted green portions are acceptable areas to drill into. Avoid drilling into the red hashed areas of a gearbox.
Not all machine guards require an interlock, but in some cases, an interlock is necessary to prevent access to a hazard while the machine is running.
An interlock is a safety device that stops the machine or prevents it from starting when the guard is opened or removed. You’ll typically see these on guards that provide direct access to moving parts.
Interlocks are commonly required when:
- The guard can be easily opened or removed without tools
- The hazard is still dangerous while the machine is running
- There is a risk of reaching the danger zone
- Local regulations or an insurance company may mandate interlocks
For example, a hinged chuck guard or a sliding enclosure may require an interlock so the machine cannot operate while the guard is open.
Interlocks may not be required when:
- The guard is fixed in place and requires tools to remove
- The guard acts as a barrier but does not provide direct access to the hazard
- The risk level is low and adequately controlled by the guard design
That said, interlocks are often used as an added layer of protection, especially in higher-risk applications. If you’re unsure whether your setup requires an interlock, it’s always best to evaluate the risk or consult applicable standards and guidelines.
For a more detailed breakdown of how interlocks work and how to wire them, see our full guide on interlock switches.
Interlock Switch Connections
Learn how to wire safety guard interlock switches.
Almost done! First, power on the machine and test all the functions, as you did in Step 2. The machine should operate normally.
Adjust the shields so they protect operators, and check the full range of motion, operator access, and stability. If you have safety interlock switches, check that they are working properly.
If you’re installing a safety shield or guard on a machine you don’t use, make sure to involve the operators. Tell them what changes you made to the machine, and teach them how to use and adjust the safeguard.
Mounting Methods for Machine Safety Shields
Bolt-On Mounting
This is going to be your go-to mounting method. You will use some type of fastener, like a bolt or screw, to hold the shield tightly against a surface. A typical installation kit for bolt-on mounting could include a drill, drill bit, tap, and some bolts and washers.
Why?
OSHA 29 CFR 1910.212 states: Guards shall be affixed to the machine where possible and secured elsewhere if, for any reason, attachment to the machine is not possible.
Simply put, bolting a safety guard or shield permanently to a machine prevents easy removal or bypass. To remove the safety guard or shield, you would need to pick up a tool, such as an Allen key, to remove the fasteners. Some local regulations require that safety guards be securely fixed and that a tool be required to remove them.
Magnetic Mounting
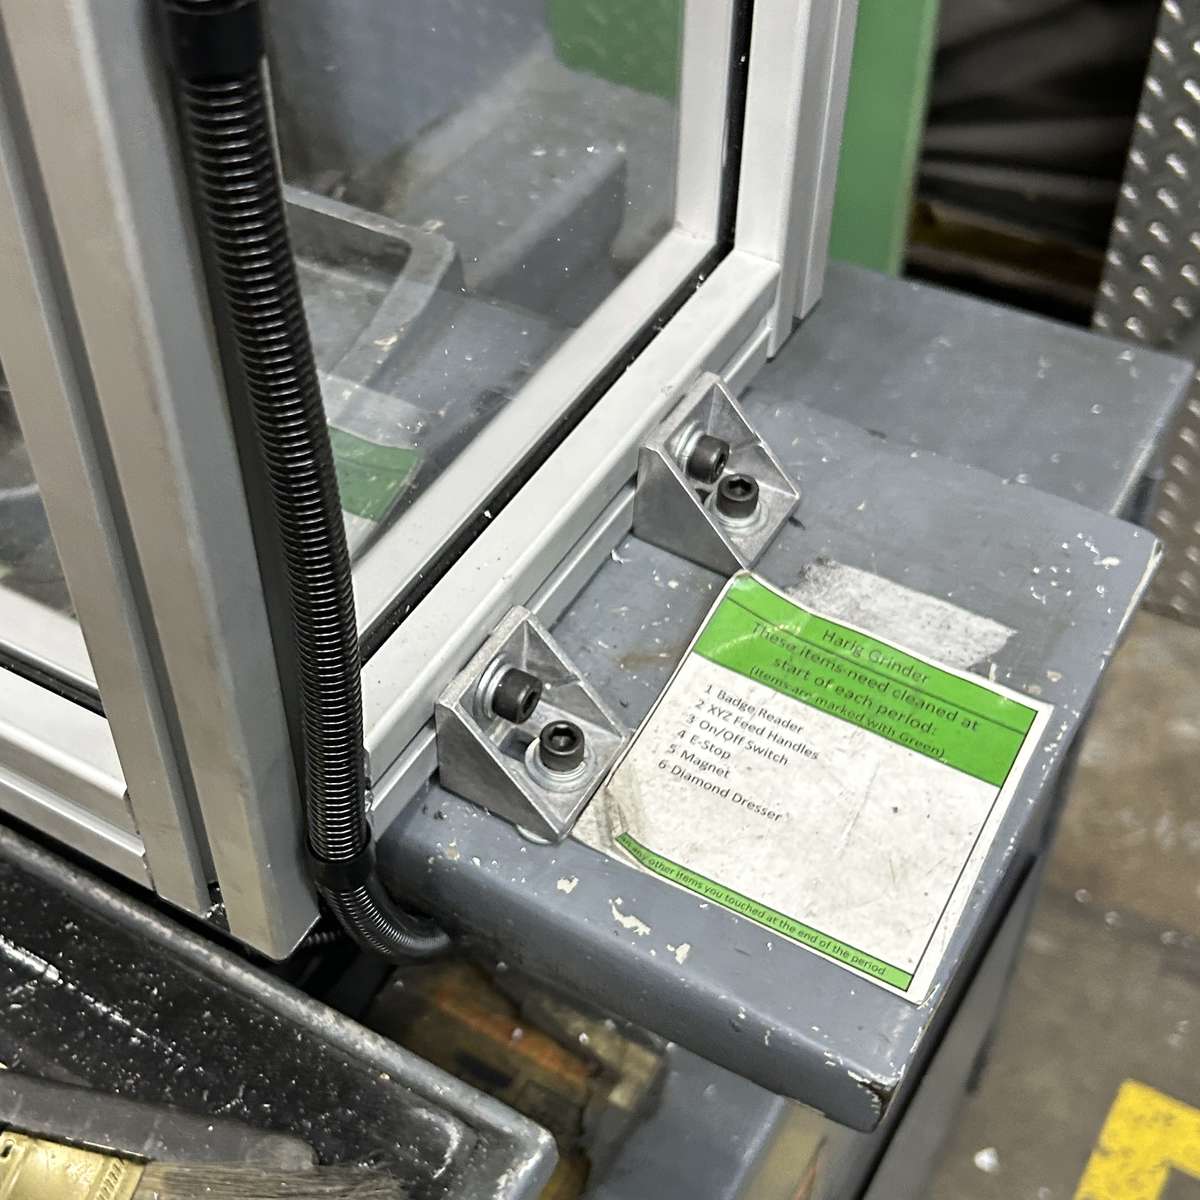
Magnetic mounting uses one or more powerful magnets to hold a shield in place. The “Magnetic base safety shield,” for example, uses a magnetic base with a switch to turn off the magnetic field for easy removal. Of course, these shields cannot stick to non-ferrous surfaces such as wood or plastic.
These types of shields are temporary in nature and can be moved or removed at any time, so they may not meet OSHA or CSA standards.
Clamp-On Brackets
This is a type of semi-permanent fixing method for safety shields. We don’t see these on machines often, mostly because of limitations in mounting locations. They require a table-like surface to clamp, but are handy for workstation shields.
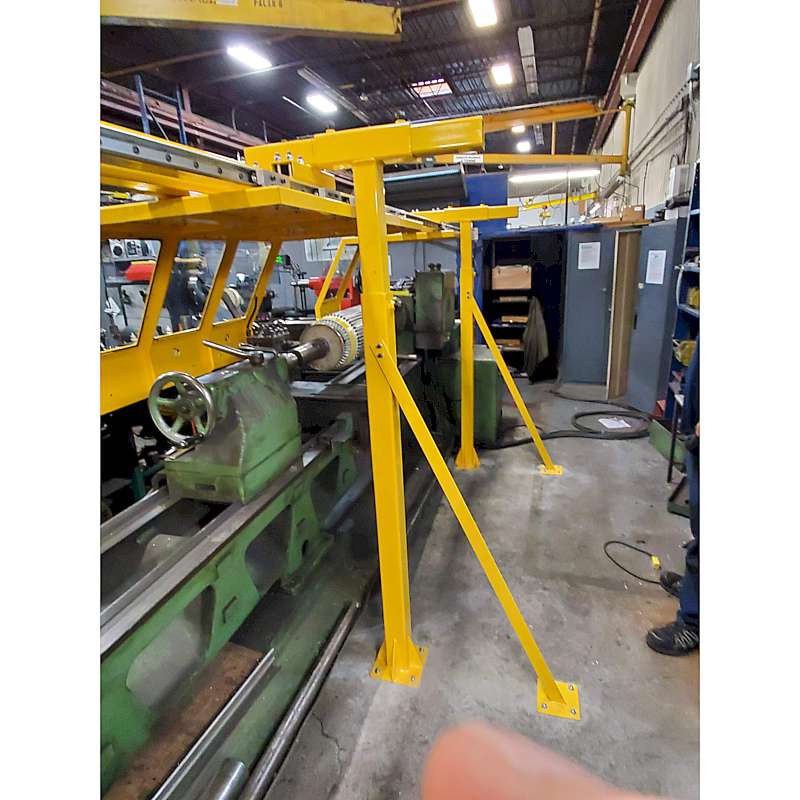
Floor/Wall Mounting
Floor- or wall-mounted safety guards and shields are used for very large guards or when machine mounting is infeasible. These types of mounting require specialized tools such as a rotary hammer and specialized drill bits.
Care must be taken to prevent drilling through pipes and electrical cables.

An example of a floor-mounted safety shield.
Application Example: Installing a Lathe Lead Screw Cover
A lathe lead screw cover helps protect operators from the rotating lead screw and feed rod. I am including this specific lathe guarding because it is one of the more difficult safety components to install and provides a good overview of the installation process. We will go through the installation steps one by one.
A lathe has many hazards (you can find out more by clicking here), but we will focus on the lead screw area. The lead screw and feed rod are typically located beneath the lathe’s carriage and engage with the carriage’s split nut. As the lead screw rotates, the carriage moves along the lathe bed. Exposed lead screws are an entanglement hazard and must be covered.
Operate the machine thoroughly, testing all functions, including the spindle, carriage movements, and threading. We want to ensure that all components are working properly.
Now, lock-out-tag-out. OSHA 29 CFR 1910.147 outlines the steps employers must take to prevent accidents involving hazardous energy.
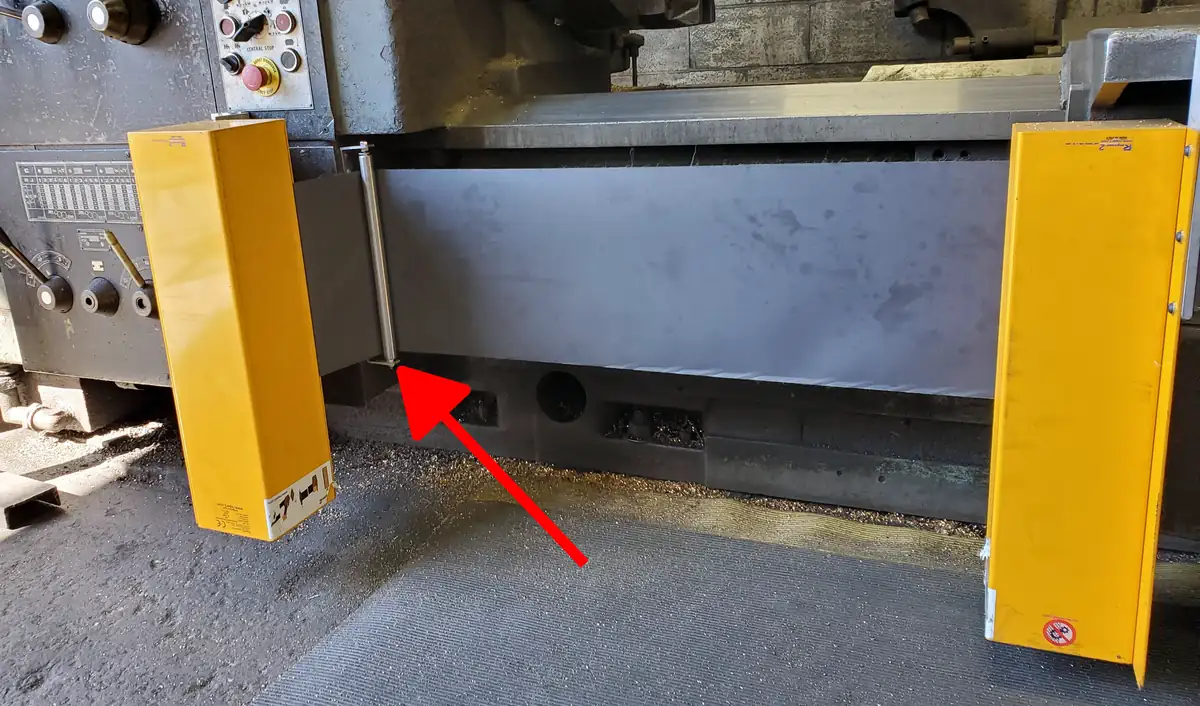
Installing a lathe lead screw cover can be very tricky, and finding suitable mounting points can be a pain. However, sometimes we can get lucky and find nice, flat spots to screw into. Remember the following image, and compare it to the next images, which show more challenging installations.
Do not drill into the shiny bedways and note where gearboxes are located. Move the carriage to both extremities and observe if there could be any potential interference between the carriage and the safeguard.
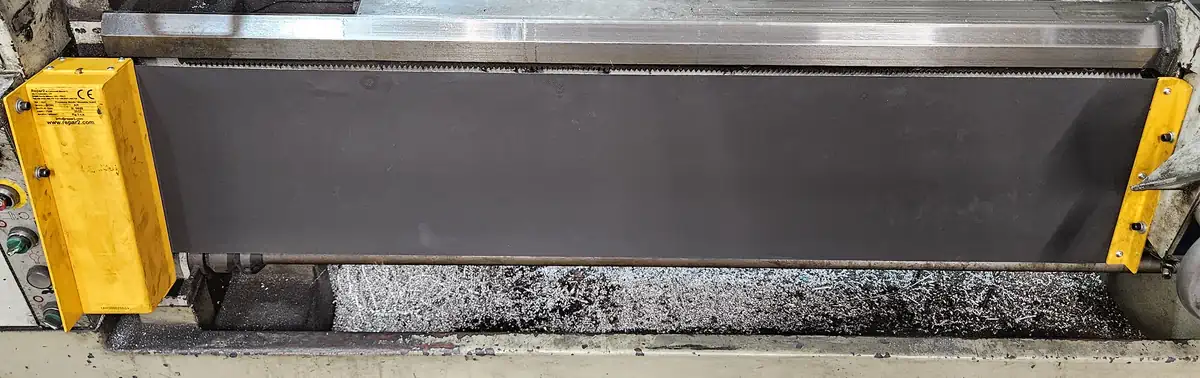
An “easy” installation of a lathe lead screw cover. Notice the screws on each end are fastened directly to the machine.
Here is where you will need to use your fabrication skills and creativity to make mounting brackets. The photo below shows an example of fabricated aluminum brackets.
This lathe required additional brackets for mounting.
Depending on the size of the lathe, these safety covers can get heavy, so we need to find sturdy mounting points and drill directly into the machine casings. Great care must be taken to avoid drilling into the oil-filled headstock or carriage gearbox.
Sometimes, we have to get really creative. The next photo shows a conveyor roller being used to guide the safety cover into the right position.
An example of a more advanced-level installation. A custom-made roller had to be used to mount the roller box in a specific area.
This step is not applicable to lathe lead screw covers, as they don’t have any interlock switches.
Here, we test the spring tension to ensure the cover does not sag and check that the cover is properly centered over the screw. Move the carriage to both extremities (left and right) to check for binding, resistance, or interference with lathe components.
Common Mistakes to Avoid
Even a well-intended installation can fall short if a few key details are overlooked.
These are the most common mistakes we see when installing machine guards in real shops:
One of the biggest mistakes is attaching guards to moving parts unless the guard is specifically designed to travel with them.
This can lead to: Misalignment over time, increased wear on the guard, and interference with machine operation.
Whenever possible, mount to solid, stationary parts of the machine.
Be very careful where you’re drilling, and be mindful of what’s behind the surface you’re drilling into. The worst I’ve seen is an emergency stop station mounted to a 240-volt motor: not only was the motor drilled into, but 3-inch-long screws were also used for fastening.
Watch out for things like electrical or sensitive components. A common mistake is applying too much pressure on the drill bit, which can cause it to break through suddenly and bottom out against the surface behind the hole.
Guards that block the operator’s view are more likely to be removed or bypassed.
Avoid: Opaque materials where visibility is needed and oversized shields that obstruct the work area. Using clear materials like polycarbonate helps maintain safety without sacrificing usability.
A guard that leaves gaps around the hazard area does not provide effective protection.
If a guard vibrates, shifts, or feels loose, it will not last long in a production environment.
Common causes:
- Mounting to the weak points on the machine
- Thin or flexible brackets
- Improper fastening methods
If a guard gets in the way, operators will find a way around it.
Be careful of:
- Contact with tooling or workpieces
- Blocking adjustments or controls
- Limiting machine travel
The guard should fit naturally into the workflow without creating frustration.
Guards that are hard to adjust, remove, or reposition often get left open or taken off entirely. If the operator has to use a screwdriver to remove a safety guard multiple times a day, they will be more inclined to remove or bypass it.
Not all guards are suited for every machine or application. For example:
- Magnetic mounts may not hold well on high-vibration equipment
- Light-duty shields may not handle heavy chip loads
- Fixed guards may not work where frequent access is required
Final Installation Checklist
Need Help Installing Machine Safety Shields?
Not sure where to mount your guard or if you’re drilling in the right spot? We deal with this every day and can help you avoid costly mistakes.
Examples of Installed Machine Safety Shields
A collection of noteworthy safety-guarding installation photos.